Why Blogger's official contact form is better than any other third party services?
This is simply because of its incredible features like as:✔ Fewer options and its hassle free neat and clean design.
✔ Instant message delivery. We receive our message as soon as someone sends it.
✔ No page reload. When we click on send message button, we don't get any page reload because contact form Gadget works on page and user receives the success message notification just below the button.
✔ Easy Customization using CSS like as text, color, width or height.
✔ We can install it on any specific/static page instead of sidebar or footer.
✔ Trust factor. This is straight from the blogger itself and we need not to worry about anything.
Important Update:- New Version of Blogger Contact form is available which is more Professional, Responsive and Better so visit new article - Add Blogger Contact Form to Pages - Pro and Responsive Version
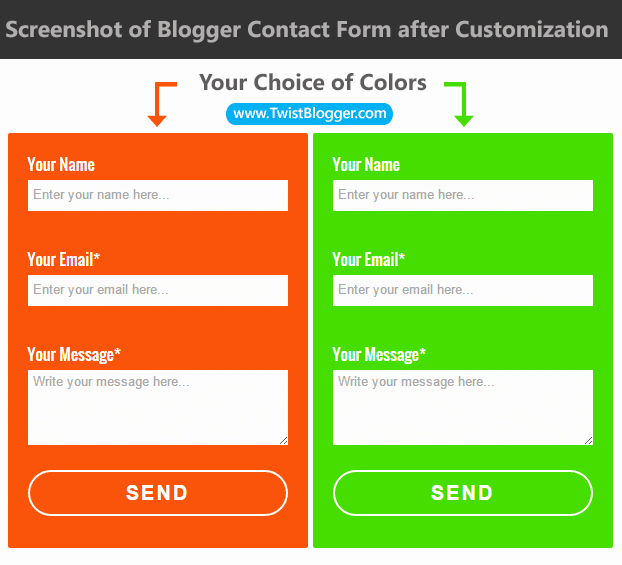
I have customized it thoroughly as much as I could and gave it more elegant look. One more thing I have added is that it will appear it the center of the page (not in left side or right side) and it is fully responsive so you need not to worry about that.
If you liked my design then we shall move on to adding our blogger contact form to a separate page of our blog. :)
You may have some more personal questions and you can ask me in comments below the post. I'll catch you there.
Important Update:- New Version of Blogger Contact form is available which is more Professional, Responsive and Better so visit new article - Add Blogger Contact Form to Pages - Pro and Responsive Version
Demo Screenshot

I have customized it thoroughly as much as I could and gave it more elegant look. One more thing I have added is that it will appear it the center of the page (not in left side or right side) and it is fully responsive so you need not to worry about that.
If you liked my design then we shall move on to adding our blogger contact form to a separate page of our blog. :)
Adding Blogger Contact Form to Separate Page of Your Blog
Important Note:- So now we are going to add contact form to blogger page step by step but before doing it, I want you to uninstall/delete this widget if you have it already installed into sidebar or footer and it does not work for you. If it is working good, but you just want to move it to a separate page then continue as it is.
Add Contact Form Gadget From Blogger Gadgets Library
If it is the first time you are going to install it then just follow the steps given below but if you have already installed it into sidebar or footer then just skip this step:
✔ Go to Template > Layout > and in the Sidebar, click on Add a Gadget link. Wait for the popup box to load.
✔ Now by default, you'll see Basics Gadgets list and to see Contact Form, just click on More Gadgets link in right side below the Basics. To understand things better, just check out the image below and follow the steps one by one.
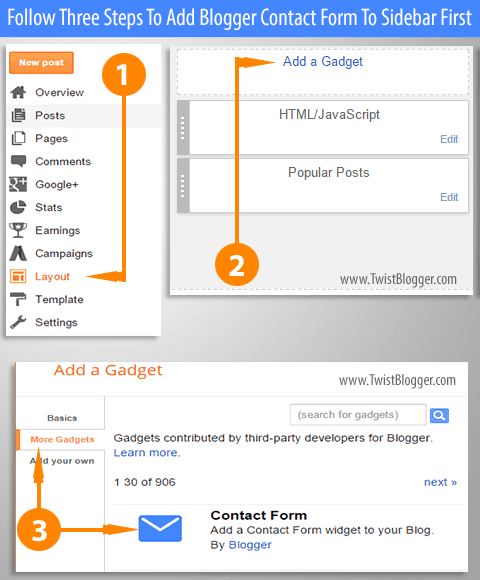
✔ Now by default, you'll see Basics Gadgets list and to see Contact Form, just click on More Gadgets link in right side below the Basics. To understand things better, just check out the image below and follow the steps one by one.

Hiding Blogger Contact Form Widget From Sidebar
Now we have successfully added the contact form but we need to hide it from appearing in the sidebar. This step is must otherwise you will see it appearing in the sidebar too.
✔ Go to Template > Edit HTML
✔ Click inside template code box and press Ctrl+f on Windows or Cmd+f on MAC to open a search box
✔ Find out this little piece of code
✔ Now paste the CSS code given below just before the above code line
✔ Now turn on the HTML mode on page editor by clicking on HTML button right side to the Compose button and remove the HTML code lines appearing there. Press Ctrl+A and hit the backspace button on your keyboard to clear everything.
✔ Click inside template code box and press Ctrl+f on Windows or Cmd+f on MAC to open a search box
✔ Find out this little piece of code
]]></b:skin> ✔ Now paste the CSS code given below just before the above code line
div#ContactForm1 {
display: none !important;
}
Now save your template code as we are done with hiding our contact form on the sidebar. Now it will not be appearing there so move on to next step below
Adding Contact Form to a Separate Page
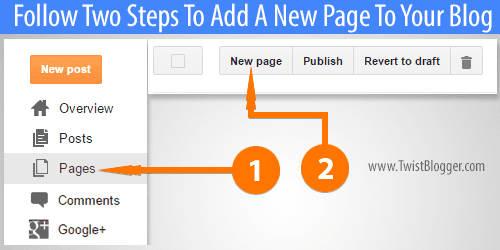
Now we need to create a new blog page and name it Contact us or Contact me in the title field to get the same permalink of it. To create a new page just follow the steps below:
✔ Go to Pages > and click on New Page link (see the image below)

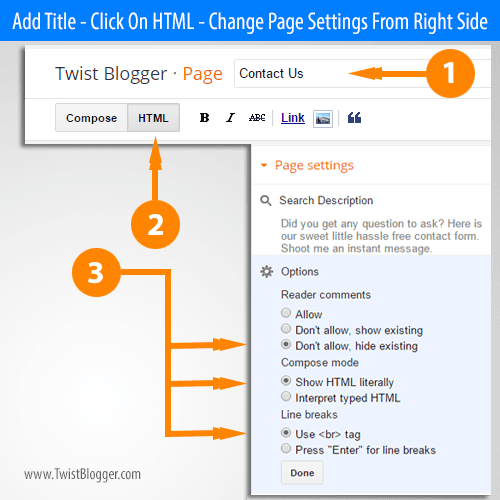
✔ First of all without doing anything else, type in the title what exactly you want your contact page URL permalink. For me, I added contact us so I got my permalink as twistblogger.com/p/contact-us.html be careful because you can not change it later.
✔ Now turn on the HTML mode on page editor by clicking on HTML button right side to the Compose button and remove the HTML code lines appearing there. Press Ctrl+A and hit the backspace button on your keyboard to clear everything.
✔ Change the page settings from right side of the page exactly as shown in the image below:

✔ Now Paste the whole Code given below into the HTML editor (after removing every existing code line inside the HTML editor).
<div dir="ltr" style="text-align: left;" trbidi="on">
Here Goes Your Contact Page Message To Visitors or Else Delete it.
<br />
<style>
.twist_blogger_cntct_form_wrap {
margin: 0 auto;
max-width: 840px;
padding: 0 10px;
position: relative;
background-color: #FDFDFD;
}
.twist_blogger_cntct_form_wrap:after, .twist_blogger_cntct_form_wrap:before {
content: '';
display: table;
clear: both;
}
/*----Change Contact Form Background Color Here----*/
div#twist_blogger_cntct_form {
padding: 20px 20px 10px 20px;
background: #FA540B;
border-radius: 2px;
margin: 20px auto 20px;
color: #FFF;
font-size: 16px;
max-width: 260px;
}
input#ContactForm1_contact-form-name, .contact-form-email, .contact-form-email:hover, .contact-form-email:active, .contact-form-email-message, .contact-form-email-message:active, .contact-form-email-message:hover {
padding: 5px;
box-shadow: none!Important;
min-width: 186px;
max-width: 260px;
width: 100%;
border: 0 !important;
line-height: 1em;
min-height: 31px;
background: #FCFCFC;
margin-bottom: 15px;
}
/**** Submit button style ****/
.contact-form-button-submit {
background: #FA540B;
font-size: 20px;
letter-spacing: 2px;
cursor: pointer;
outline: none!important;
color: #FFFFFF;
border: 2px solid rgba(255,255,255,1);
border-radius: 50px;
min-width: 186px;
max-width: 260px;
width: 100%;
text-transform: uppercase;
height: 46px;
margin-top: 10px!important;
transition: all 300ms ease-;
-webkit-transition: all 300ms ease-in-out;
-moz-transition: all 300ms ease-in-out;
}
/**** Submit button on mouse hover ****/
.contact-form-button-submit:hover {
border: 2px solid;
color: #FFFFFF;
background: #EF4800 !important;
}
/**** Submit button on Focus ****/
.contact-form-button-submit:focus, .contact-form-button-submit.focus {
border-color: #FFFFFF;
box-shadow: none !important;
}
/**** Error message and Success Message ****/
.contact-form-error-message-with-border .contact-form-success-message {
background: #f9edbe;
border: 1px solid #f0c36d;
bottom: 0;
box-shadow: 0 2px 4px rgba(0,0,0,.2);
color: #666;
font-size: 12px;
font-weight: bold;
padding-bottom: 10px;
line-height: 19px;
margin-left: 0;
opacity: 1;
position: static;
text-align: center;
}
</style>
<br />
<br />
<div class="twist_blogger_cntct_form_wrap">
<div id="twist_blogger_cntct_form">
<form name="contact-form">
Your Name<br />
<input class="contact-form-name" id="ContactForm1_contact-form-name" name="name" placeholder="Enter your name here..." size="30" type="text" value="" /><br />
<br />
Your Email*<br />
<input class="contact-form-email" id="ContactForm1_contact-form-email" name="email" placeholder="Enter your email here..." size="30" type="text" value="" /><br />
<br />
Your Message*<br />
<textarea class="contact-form-email-message" cols="25" id="ContactForm1_contact-form-email-message" name="email-message" placeholder="Write your message here..." rows="5"></textarea><br />
<input class="contact-form-button contact-form-button-submit" id="ContactForm1_contact-form-submit" type="button" value="Send" /><br />
<div style="max-width: 260px; text-align: center; width: 100%;">
<div class="contact-form-error-message" id="ContactForm1_contact-form-error-message">
</div>
<div class="contact-form-success-message" id="ContactForm1_contact-form-success-message">
</div>
</div>
</form>
<br />
</div>
</div>
</div>
✔ Publish your page now and check it out. Send yourself a message to confirm that blogger contact form is working or not. You should receive your message as soon as you hit the send button. It must be working for everyone, I hope so.
Some frequently asked questions you might be curious to know are answered below but if you have more questions then add them in comments, I'll reply you there.
Some frequently asked questions you might be curious to know are answered below but if you have more questions then add them in comments, I'll reply you there.
Some FAQs About Blogger Contact Form Gadget
Question No. 1 - Where will these messages go?
Answer: Whenever someone sends you a message from your blog's contact form, it will be delivered to the email address of the blog admin instantly. If your blog has more than one blog administrators then the messages will be sent out to all of them. In case you want to add a new blog administrator to your blog, then just go to Settings > Basic > Add Authors and invite anyone using his/her email address. He/she will receive an email from blogger and as soon as he accepts your invitation, he will appear in the authors list from where you can mark him as an administrator.
Question No. 2 - Can I add/alter customs fields of blogger contact form?
Answer: Somewhat yes, you can do it if you're good into JavaScript but that is beyond the level of my expertise area. :) So in my case I can not do this. I hope someone will come up with this twist and Google will help you in finding that tutorial.
Question No. 3 - Will adding blogger contact form to a separate page affect the SEO of my blog?
Answers: No, it will certainly not. Although its always good to be on the safe side so you can add few lines on the contact page. You can check our Contact Us page for reference.Question No. 4 - Why should I use Blogger contact form on a specific page rather than on sidebar?
Answer: It depends on you, the blog administrative but its always good to have a special dedicated page and visitors always expect that there will be a contact page on your blog where they can contact you and for that, they look at the Navigation bar of your blog for a link. It gives your blog a professional touch. Believe me, these things do work when it comes to credibility. On a separate page, you can also add some guideline to your visitors before they fill up the form and send you a message.Question No. 5 - Why blogger contact form is not working? Even after the success message notification?
Answers: There may be a lot of reasons for it that like as you did not check the email account which is associated with your blogger blog or else you did not install it properly. In this case, just remove the contact form widget from your blog and re-install it again or else add your blog URL in comment box and I'll surely check it out if you want it.You may have some more personal questions and you can ask me in comments below the post. I'll catch you there.
Finally I did my best and if still you are facing some problems then let me know so that I can guide you thoroughly. Leave your blog address in comments and I will check it for sure. And please if you have little time, do me a favor by giving me the feedback on it as it will be helpful for me to ensure that blogger contact form working perfectly.
You can support this blog by socializing on Facebook, Google Plus and Twitter. :) Stay Blessed!
You can support this blog by socializing on Facebook, Google Plus and Twitter. :) Stay Blessed!
Add Blogger Contact Form to Any Static Page
4/
5
By
Editorial Board


Dear Reader! We’re enthusiastic to see your comment but after reading the Content please ask for advice and to provide constructive feedback Please Write Relevant Comment with Polite Language.Your comments inspired me to continue blogging. Your opinion much more valuable to me.
Let’s enjoy a personal and evocative conversation. Thank You!